How To Start Herringbone Pattern
How To Start Herringbone Pattern - Web find herringbone pattern tile and herringbone pattern wood floor ideas for your renovation, complete with herringbone pattern pictures from designers. Web here’s how to tile a herringbone pattern from start to finish. Web the herringbone pattern is beautiful and we are going to show you how to get the exact same look when laying your own tile.in this video we take you through. Web a simple way to get started installing a herringbone tile pattern. Start by holding a piece in position, with the bottom point edge against the edge (wall, in this case). Repair any damage and add backer boards where needed. Place another board or a level or some other straight edge against the first piece of wood and use it to draw a line along the first board. Web wondering how to lay a herringbone tile pattern? Web see our 2024 guide on herringbone patterns. Web this is a demonstration showing how to set out and lay a 90 degree herringbone pattern in paving. Web a simple way to get started installing a herringbone tile pattern. How to install a herringbone floor overview. Planning the herringbone pattern is probably the most time consuming part but well worth the effor. Web wondering how to lay a herringbone tile pattern? Visit the official b&q youtube. This how to guide from homebase will tell you everything you need to know. Start by holding a piece in position, with the bottom point edge against the edge (wall, in this case). Web this is a demonstration showing how to set out and lay a 90 degree herringbone pattern in paving. Web achieve patio perfection: This is the simpler of the herringbone patterns to install. Web find herringbone pattern tile and herringbone pattern wood floor ideas for your renovation, complete with herringbone pattern pictures from designers. Here is a simple way of getting started with two different kinds of tile: Find out how the different patterns of herringbone can be incorporated into a client’s home. Web achieve patio perfection: Careful surface preparation is essential in. Web installing herringbone tiles can be a fun and rewarding project, even for beginners. Here is a simple way of getting started with two different kinds of tile: Web how to lay herringbone tile. Web the herringbone pattern is beautiful and we are going to show you how to get the exact same look when laying your own tile.in this. Herringbone pattern installation guide 🌟🔨 in this video, we'll guide you through the process of laying a stunning herringbone pa. Web installing herringbone tiles can be a fun and rewarding project, even for beginners. This gives you your angle. Place another board or a level or some other straight edge against the first piece of wood and use it to. This is the simpler of the herringbone patterns to install. How to install a herringbone floor overview. Web how to lay herringbone tile: Place another board or a level or some other straight edge against the first piece of wood and use it to draw a line along the first board. Here's what you need to know about laying it. Careful surface preparation is essential in any tiling project to ensure its suitability. Visit the official b&q youtube. Planning the herringbone pattern is probably the most time consuming part but well worth the effor. But don’t worry—peterson’s method will keep you on track. This is usually taken to be a line along the main direction of travel or one that. Begin by preparing your surface, ensuring it is clean, dry, and level. But don’t worry—peterson’s method will keep you on track. It’s no harder than other subway tile patterns with this step by step guide that shows how to measure, mark, cut and lay the tiles for a perfect job. Web how to lay herringbone tile: Regardless of whether it. Here is a simple way of getting started with two different kinds of tile: This gives you your angle. Web a simple way to get started installing a herringbone tile pattern. Careful surface preparation is essential in any tiling project to ensure its suitability. Web installing herringbone tiles can be a fun and rewarding project, even for beginners. This is usually taken to be a line along the main direction of travel or one that is parallel. Web here is how we did it. It’s no harder than other subway tile patterns with this step by step guide that shows how to measure, mark, cut and lay the tiles for a perfect job. In this blog post, we’ll. It’s no harder than other subway tile patterns with this step by step guide that shows how to measure, mark, cut and lay the tiles for a perfect job. Repair any damage and add backer boards where needed. Web for week 4 of the jeffrey court renovation challenge, we started tiling a bathroom wall in a herringbone pattern. Web installing. Here's what you need to know about laying it successfully. Start by holding a piece in position, with the bottom point edge against the edge (wall, in this case). Place another board or a level or some other straight edge against the first piece of wood and use it to draw a line along the first board. This gives you. Web how to lay herringbone tile: Here's what you need to know about laying it successfully. Web for week 4 of the jeffrey court renovation challenge, we started tiling a bathroom wall in a herringbone pattern. Web a simple way to get started installing a herringbone tile pattern. Start by holding a piece in position, with the bottom point edge against the edge (wall, in this case). How to install a herringbone floor overview. In this blog post, we’ll explain what herringbone is, show you how to lay it out & give you tips for choosing the right colors & materials & much more. Web learn how a herringbone pattern can bring visual depth and dimension to various décor and design projects in your home. Web find herringbone pattern tile and herringbone pattern wood floor ideas for your renovation, complete with herringbone pattern pictures from designers. Home depot restore 3×6 subway tile from daltile. Repair any damage and add backer boards where needed. Find out how the different patterns of herringbone can be incorporated into a client’s home. It’s no harder than other subway tile patterns with this step by step guide that shows how to measure, mark, cut and lay the tiles for a perfect job. Herringbone pattern installation guide 🌟🔨 in this video, we'll guide you through the process of laying a stunning herringbone pa. Planning the herringbone pattern is probably the most time consuming part but well worth the effor. Mercifully, he used prefinished planks for our project, so no sanding or sealing.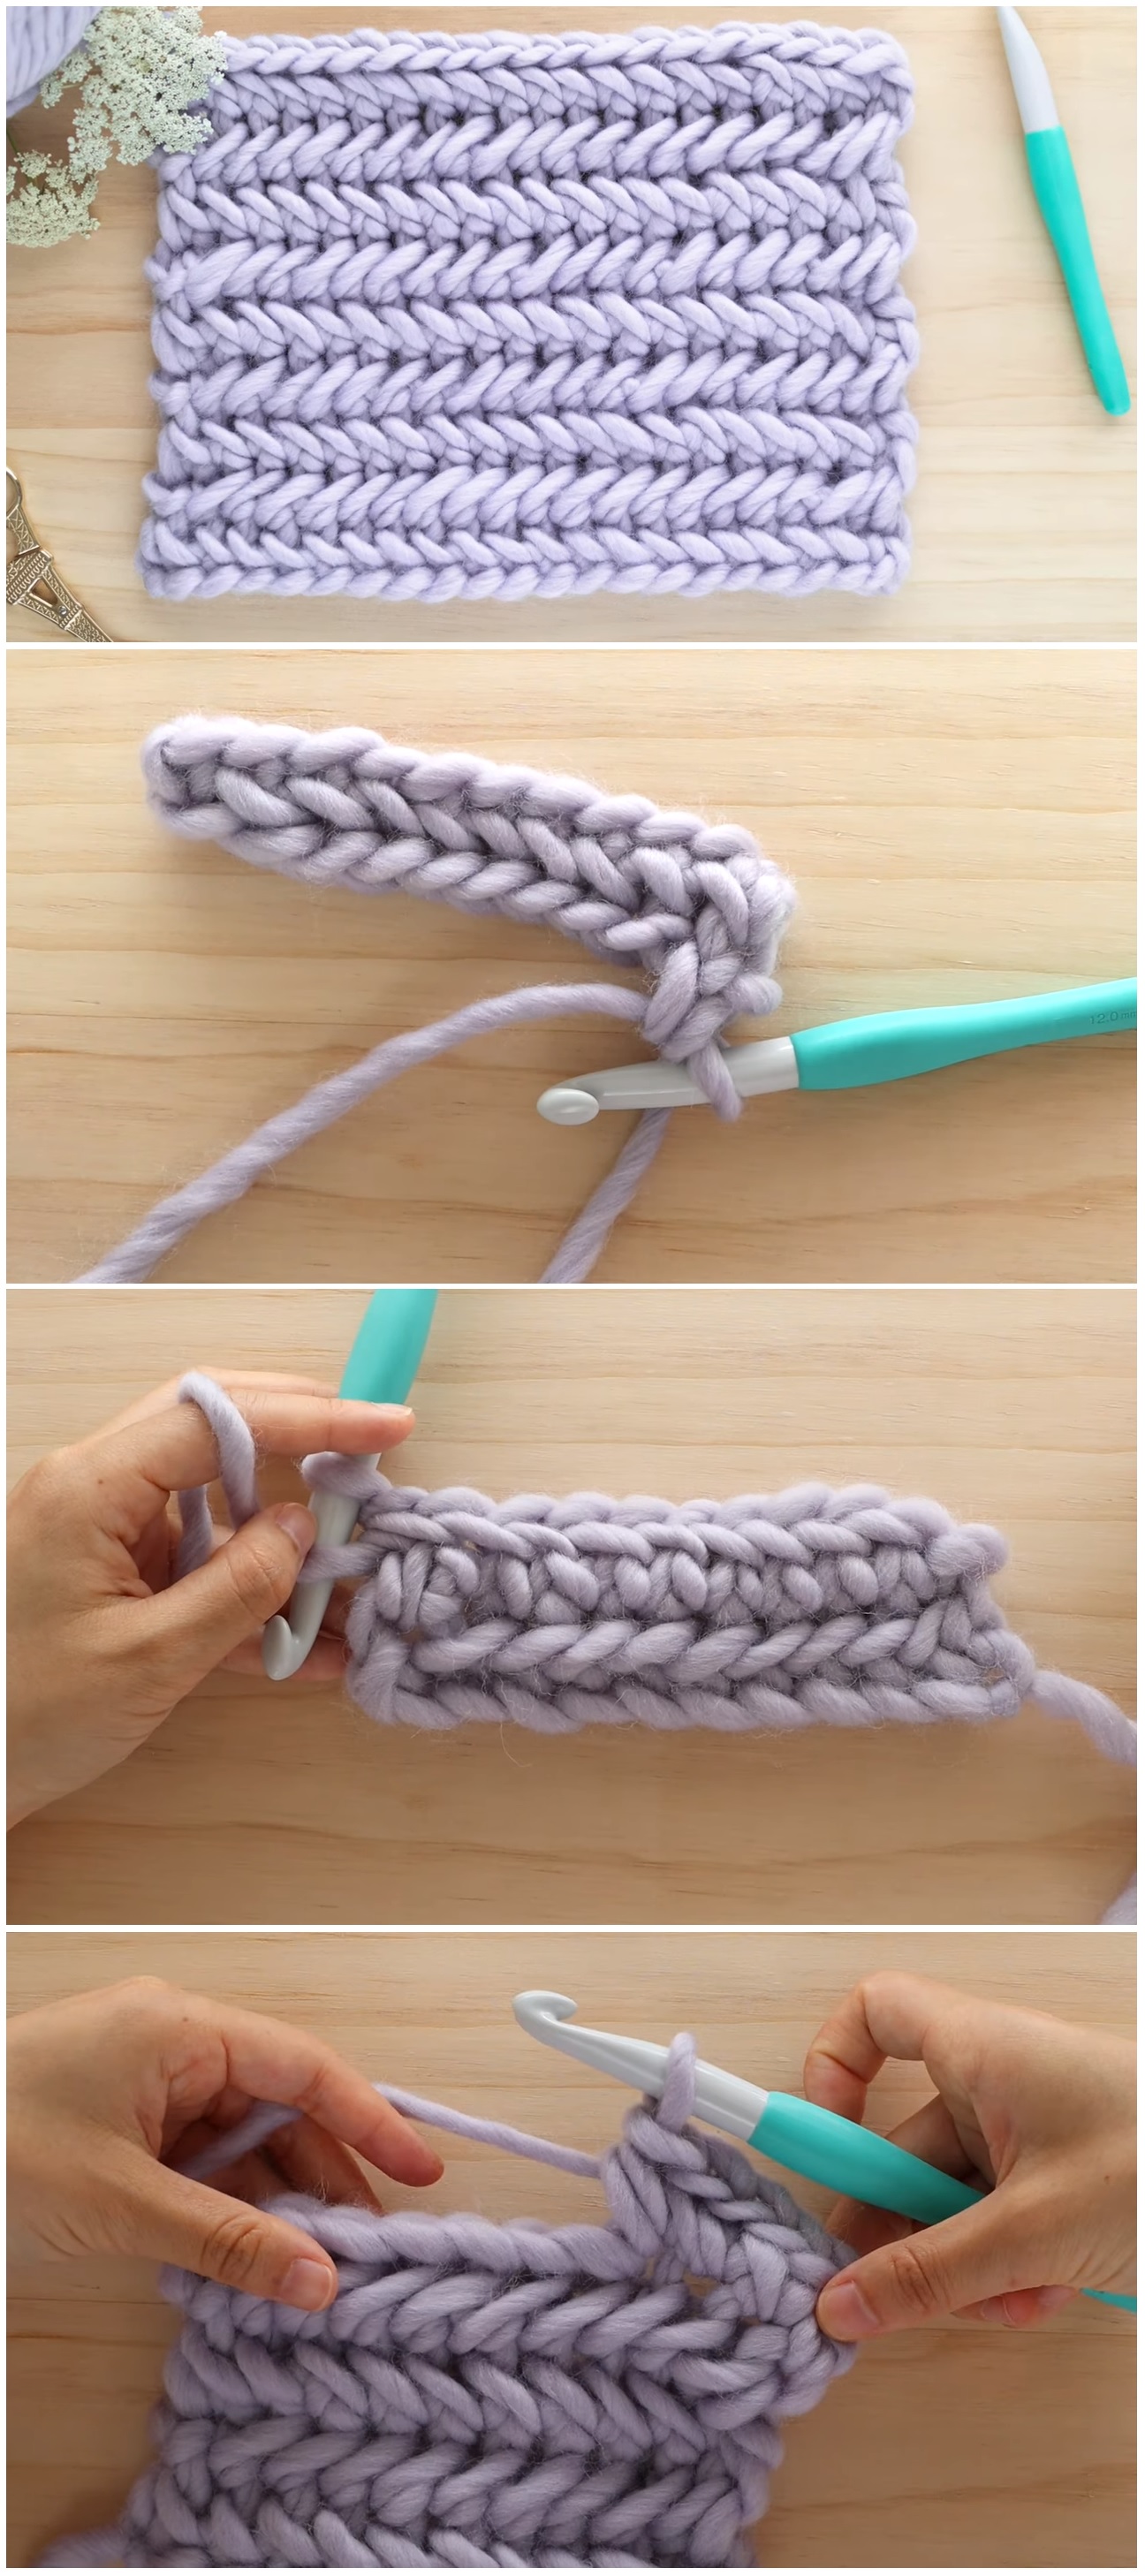
Herringbone Single Crochet Stitch Tutorial Tutorials & More

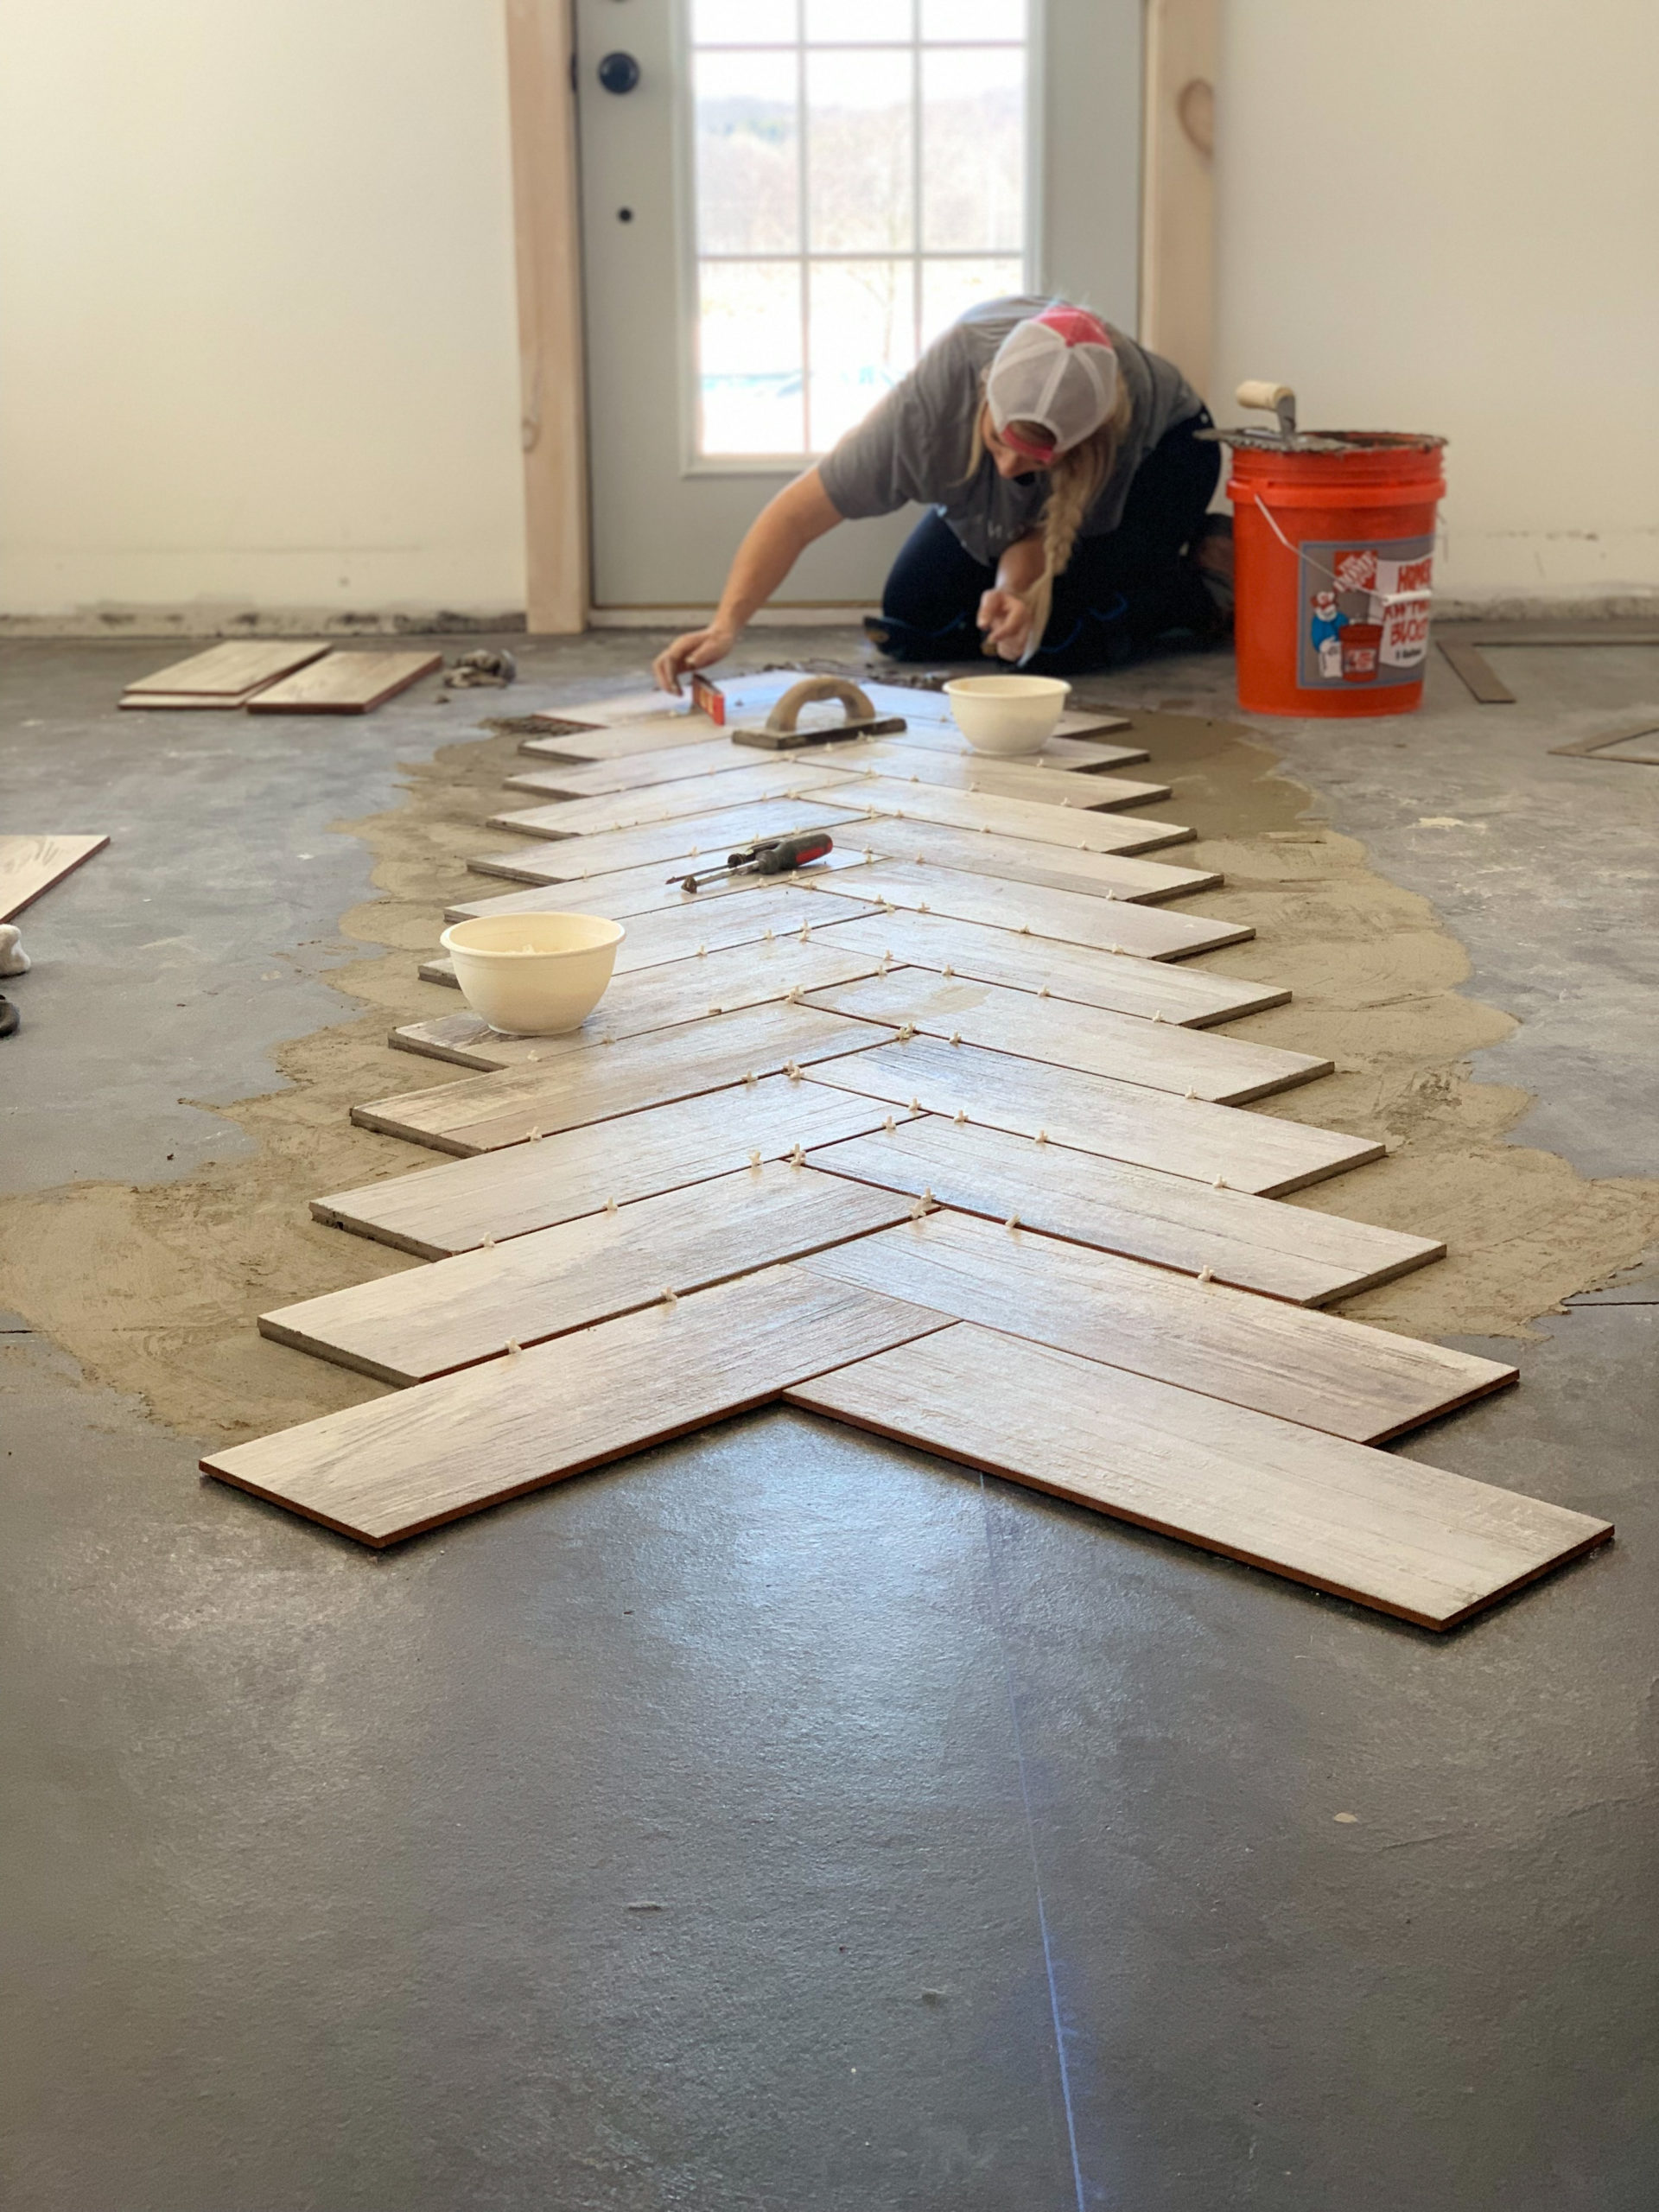
How to Make a Wood Herringbone Pattern Welsh Design Studio

How to Make a Wood Herringbone Pattern Welsh Design Studio

How to create a Herringbone pattern in Adobe Illustrator YouTube

What You Should Know About the Herringbone Pattern
How To Install A Herringbone Pattern Wood Floor Viewfloor.co

What You Should Know About the Herringbone Pattern

Easiest ways To Create Herringbone Pattern YouTube
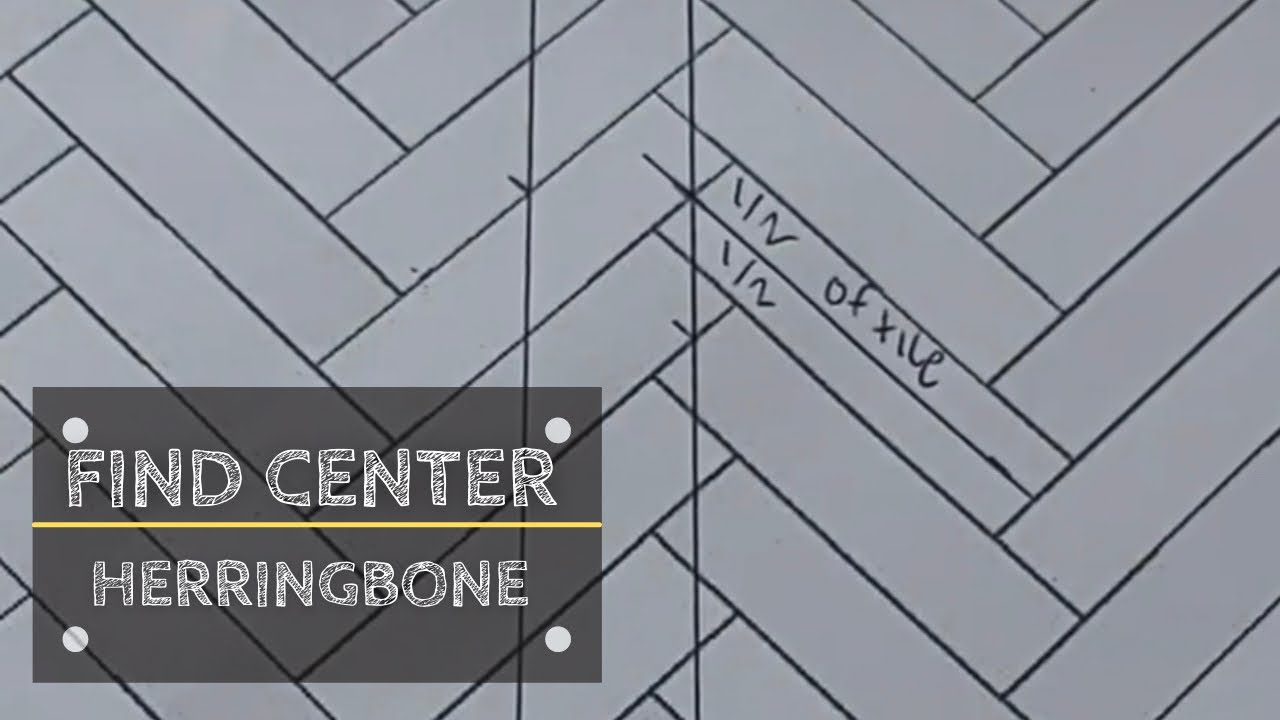
how to layout herringbone pattern

Clever How To Start A Herringbone Tile Patterntile Design Ideas
But Don’t Worry—Peterson’s Method Will Keep You On Track.
Web Love A Herringbone Pattern Tile, But Worried It’s Not Easy To Create?
Today I’ll Be Sharing With You Our Progress So Far And I’ll Make Sure To Tell You How To Make A Beautiful Herringbone Pattern When Tiling.
Here Is A Simple Way Of Getting Started With Two Different Kinds Of Tile:
Related Post: